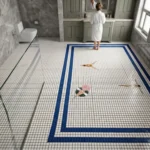
Mosaic tile borders and trim are the smallest design elements that produce the largest visual payoff. A single row of glass listello between two plain field tiles can turn a basic bathroom into a custom, high-end installation. Yet borders and trim are also among the most overlooked details in tile specification — chosen late, sized incorrectly, and installed without enough thought about transitions.
This guide explains what mosaic borders, listellos and trim pieces actually are, how they are made, the materials available, where to use them, how to size them correctly, and what to budget. Whether you are finishing a kitchen backsplash, a hotel bathroom, or a pool waterline, the right border detail is what makes the project look intentional rather than assembled.
What Are Mosaic Tile Borders and Trim?
A mosaic border is a decorative strip of small tiles, typically mounted on mesh or paper backing, used to separate, frame, or transition between larger surfaces. The trade uses several overlapping terms:
- Listello — a narrow decorative strip or border, often pre-assembled on mesh, used horizontally between courses of field tile.
- Pencil liner — a thin, rounded or square-edged solid piece (glass, stone, or ceramic) that creates a clean, minimal line.
- Border sheet — a full sheet of small mosaic tiles (usually 1×1 or smaller) arranged in a single repeating band.
- Deco / accent strip — a wider decorative band that may combine multiple materials, patterns, or colours.
- Cove and cap trim — functional pieces that finish the top edge of a tiled surface or the transition at a floor-to-wall junction.
The key distinction to understand: border and trim pieces are sold by linear foot (or linear metre), not by area. This changes how you estimate quantities, and it is one of the most common causes of ordering mistakes.
How Borders and Trim Are Made
Most mosaic borders are produced in one of three ways:
- Mesh-mounted strips. Individual tiles are arranged into a repeating pattern and bonded to a fibreglass mesh backing. These ship as flexible strips that installers cut to length on site. This is the standard format for glass, stone, and mixed-material listellos.
- Paper-faced strips. Tiles are face-mounted to paper; the paper is removed after the adhesive sets. Paper-facing is common for very small tesserae and for borders that must sit perfectly flush.
- Extruded and cut solids. Pencil liners and some stone profiles are cut from a solid billet rather than assembled from individual tiles, giving them a continuous, uninterrupted line.
Mesh-mounted strips are the most forgiving for most projects because they can be flexed slightly to follow minor substrate irregularities, and they are easy to cut cleanly with a wet saw or tile nippers.
Material Options for Borders and Trim
The material you choose for a border should match both the field tile and the environment.
Glass Listellos
Glass mosaic listellos are the most popular choice for kitchen and bathroom accents. They offer a deep, jewel-like colour, a smooth surface that is easy to clean, and near-zero water absorption (typically below 0.5%). Glass is the best choice for wet areas and for creating crisp colour contrast. Iridescent and metallic-coated glass listellos are frequently used to add a subtle highlight without changing the overall colour scheme.
Natural Stone Listellos
Marble, travertine, and slate borders add warmth and a sense of permanence. A marble pencil liner or a split-face stone listello works well where the field tile is also natural stone, or where the design calls for an organic, textural edge. Natural stone borders must be sealed, and in wet areas they require the same maintenance discipline as the stone field tile.
Ceramic and Porcelain Trim
Ceramic and porcelain borders are the budget-friendly option and the most durable in high-traffic areas. Porcelain in particular is dense, scratch-resistant, and available in both glossy and matte finishes. Glazed ceramic listellos are a classic choice for framed shower niches and period-style bathrooms.
Metal Trim
Brushed stainless steel, brass, and aluminium strips function more as transition profiles than decorative listellos, but they are essential for finishing exposed tile edges at corners and outside edges. Metal trim is specified by profile shape (L, T, U, and rounded) and by the depth of the tile it must cover.
Where to Use Mosaic Borders and Trim
Borders and trim solve four distinct problems: framing, transitioning, accentuating, and finishing.
Framing Shower Niches and Feature Areas
A framed shower niche is one of the highest-impact, lowest-cost upgrades in a bathroom, and it pairs perfectly with a mosaic tile shower floor. A contrasting glass listello around the niche perimeter draws the eye to the feature and hides the imperfect cut edge of the field tile. The same technique frames vanity mirrors, inset shelves, and wall-mounted medicine cabinets.
Kitchen Backsplash Accents
A horizontal listello strip running across a kitchen backsplash at eye level breaks up large fields of subway or slab tile. The classic formula is a field tile below, a single row of decorative border at the 36 to 42 inch mark, and a lighter field tile above. This technique is covered in more depth in our mosaic backsplash ideas guide.
Pool Waterline Borders
At the swimming pool waterline, a mosaic border does double duty: it marks the water line visually and covers the transition between the pool wall and the coping. Waterline borders must be frost-resistant, chemical-resistant, and slip-rated, and they are normally specified from glass or porcelain. For the full technical requirements, see our swimming pool mosaic specification guide.
Floor-to-Wall Transitions
Cove and cap trims finish the junction where a tiled floor meets a tiled wall, creating a smooth, cleanable radius instead of a hard 90-degree corner. This detail matters most in commercial kitchens, bathrooms, and any space that will be wet-cleaned.
Room Dividers and Field Accents
A wider deco strip can act as a visual room divider within an open floor plan, or as a horizontal datum line that carries the eye through a long corridor or a hotel lobby. In hospitality projects, a signature border pattern is an inexpensive way to reinforce brand colour and identity across many rooms.
How to Size and Specify Borders
Getting the size right is where most projects go wrong. Follow these rules:
- Match the field tile thickness. A listello should be the same depth as the surrounding field tile, or slightly thinner with a build-up layer of adhesive behind it. A border that protrudes past the field tile is a snag and a cleaning hazard.
- Scale the border to the space. In a small bathroom, a 1-inch listello reads as a refined detail; in a large hotel lobby or a 25-metre pool, that same border disappears. Use wider deco strips (2 to 4 inches) for large commercial surfaces.
- Calculate by linear measure, then add waste. Measure the total linear run, divide by the length of one strip, and add 10 to 15 percent for cuts, corners, and pattern matching. Never estimate borders from the square footage of the field tile.
- Plan corner treatment before ordering. Inside corners are simple mitres; outside corners on a niche or a column need a finished profile — either a matching trim piece or a bullnose. Decide this at specification stage so the right pieces are ordered.
- Specify the grout joint. Borders with mixed material (for example, stone field tile with a glass listello) may need slightly different grout joints. Confirm the joint width works for both materials before the border is ordered.
Installation Best Practices
Borders and trim are unforgiving of poor substrate preparation because any deviation shows immediately as a wavy line. Key points:
- Prepare a flat, clean substrate. A border will magnify any undulation in the wall. Address level before you start.
- Lay out the datum line first. Snap a level reference line for horizontal borders, or a plumb line for vertical runs, before spreading adhesive.
- Use the correct adhesive. Glass listellos need a white, polymer-modified thin-set to avoid colour shadowing through translucent tiles. Follow our mosaic installation tutorial for substrate and adhesive detail.
- Back-butter or back-fill thin tiles. When a listello is thinner than the field tile, build up behind it so the face sits flush.
- Grout with care, then seal. Use unsanded grout for joints under 1/8 inch, and seal natural stone borders immediately after grouting.
Cost: What to Budget
Mosaic borders are priced per linear foot, and the range is wide:
| Border type | Typical cost per linear foot |
|---|---|
| Ceramic / porcelain listello | $3 – $8 |
| Glass listello (single colour) | $6 – $18 |
| Iridescent or metallic glass listello | $12 – $30 |
| Marble or travertine pencil liner | $8 – $20 |
| Mixed-material deco strip | $15 – $40 |
| Custom / branded border pattern | $25 – $80+ |
Installation adds $5 to $15 per linear foot on top of the material, depending on complexity and whether the border runs through corners or niches. A single 8-foot backsplash accent strip is a $50 to $150 material line item; a full pool waterline border for a standard residential pool can run $1,500 to $4,000 in material alone.
Choosing a Supplier
Because borders are cut, matched, and colour-batched in production, the quality of the supplier determines whether the finished line is crisp or wavy. When evaluating a supplier, ask for the same things you would for field tile: sample swatches of the actual border (not a stock photo), batch consistency across production runs, and cut-edge tolerances. A supplier with in-house glass colour matching can also produce a custom border in your exact brand colour — a detail that matters disproportionately in hospitality and retail projects.
At BiliTiles, mosaic borders and listellos are produced alongside our field tile collections, so colour and material matching across the border and the surrounding field is guaranteed at the factory level rather than approximated on site.
Conclusion
A mosaic border or trim piece is a small purchase that signals a well-specified project. It frames features, hides transitions, reinforces brand identity, and adds perceived value far beyond its cost per linear foot. The keys are choosing a material that matches the environment, sizing the border to the space, specifying corner treatment up front, and ordering by linear measure with proper waste. Done correctly, a single well-placed listello is often the difference between a room that looks finished and one that looks simply tiled.